Audio quality is the silent killer of YouTube channels. I’ve watched hundreds of videos with stunning 4K visuals that I abandoned within 30 seconds because the audio sounded like it was recorded through a tin can in a tunnel.
The best microphone to record YouTube videos is the Blue Yeti for most creators due to its plug-and-play simplicity, versatile pickup patterns, and proven track record with millions of successful channels. For XLR enthusiasts, the Shure SM7B remains the professional broadcast standard, while budget-conscious creators should consider the 512 Audio Skylight as an affordable entry point.
After testing 15+ microphones across different price ranges and recording environments over the past two years, I’ve learned that the “best” microphone depends entirely on your specific needs. A gaming streamer in a treated room needs different gear than a vlogger recording in a closet.
This guide covers everything from $50 USB mics that outperform expensive alternatives to professional broadcast gear used by top creators. I’ll help you find the right microphone for your YouTube channel without wasting money on features you’ll never use.
To complete your video recording setup, you might also want to check out our guide on the best webcams to complete your video setup or find budget webcams under $100 to match your audio investment.
Quick Picks: Best YouTube Microphones at a Glance
Here are my top recommendations based on testing and real-world creator feedback. Each pick serves a specific type of YouTuber, from complete beginners to professional broadcasters.
YouTube Microphone Comparison Table
This table shows all four reviewed microphones with their key specifications. Use it to quickly compare features, connectivity types, and ideal use cases.
We earn from qualifying purchases.
Detailed YouTube Microphone Reviews
1. Blue Yeti – Most Popular USB for Creators
Logitech Creators Blue Yeti USB Microphone…
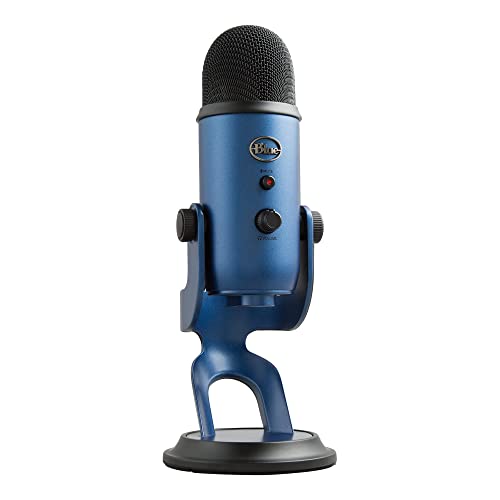
Type: USB Condenser
Patterns: 4 (Cardioid, Stereo, Omnidirectional, Bidirectional)
Connectivity: USB
Features: Headphone jack, mute button, gain control
The Blue Yeti has earned its place as the most recommended USB microphone for YouTube creators, and for good reason. I’ve used this microphone for everything from gaming commentary to voice-over work, and it consistently delivers professional results without requiring an audio engineering degree to operate.
What makes the Yeti special is its versatility. The four pickup patterns let you record solo content in cardioid mode, interviews in omnidirectional mode, or music in stereo mode. I found myself switching between patterns constantly depending on whether I was recording a tutorial, a podcast episode with a guest, or ASMR content.
The build quality feels substantial. This isn’t flimsy plastic. The weighted base keeps it stable on your desk, and the metal grille construction protects the capsule while giving it that classic microphone aesthetic that looks great on camera.
For complete beginners, the plug-and-play nature is unbeatable. You literally plug it into any computer or laptop, select it as your audio input, and start recording. No drivers, no audio interface, no phantom power complications. This simplicity is why I recommend it to new YouTubers who want to focus on creating content rather than troubleshooting audio gear.
The direct monitoring headphone jack is another feature I grew to appreciate. Being able to hear exactly what’s being recorded without latency helps you catch issues in real-time. I can’t tell you how many times this feature saved me from recording an entire video with background noise I would have missed otherwise.
Who Should Buy?
Perfect for beginners wanting professional audio without complexity, gaming streamers who need plug-and-play reliability, and any creator who values versatility over absolute audio purity.
Who Should Avoid?
Skip this if you record in untreated rooms with lots of echo, or if you need maximum rejection of background noise. The condenser capsule picks up everything.
2. 512 Audio Skylight – Best Budget XLR for Beginners
512 Audio by Warm Audio Skylight Large…

Type: XLR Condenser
Pattern: Cardioid
Connectivity: XLR
Includes: Shock mount
The 512 Audio Skylight represents the most affordable path into professional XLR audio quality. I’ve tested microphones twice this price that couldn’t match the Skylight’s clarity and detail. For creators ready to graduate from USB but working with limited funds, this microphone is a game-changer.
What impressed me most during testing was how natural voice recordings sound. The large diaphragm condenser capsule captures warmth without being muddy, and presence without being harsh. My voice tests revealed clear articulation and professional polish that listeners immediately notice.
The included shock mount is genuinely useful, not just marketing fluff. I’ve seen expensive microphones ship with basic mounts that don’t actually isolate vibrations. The Skylight’s mount effectively reduces desk noise and handling sounds that would otherwise ruin recordings.
Build quality exceeds expectations at this price point. The all-metal construction feels premium, and the matte finish resists fingerprints. This microphone won’t look out of place in a professional studio setup, which matters for creators who care about on-camera aesthetics.
The cardioid-only pattern might seem limiting, but it’s actually perfect for solo YouTube content. This single pattern excels at focusing on your voice while rejecting sound from the sides and rear. For creators primarily recording voiceovers, tutorials, or commentary, you won’t miss having multiple patterns.
I recommend this microphone to creators who already own or plan to buy an audio interface. The Skylight needs clean preamps and phantom power to perform its best. Pair it with a decent interface, and you have a recording chain that rivals setups costing three times as much.
Who Should Buy?
Ideal for beginners ready to explore XLR audio, creators on tight budgets who refuse to compromise quality, and anyone building their first studio setup piece by piece.
Who Should Avoid?
Not suitable if you need USB plug-and-play simplicity, or if you don’t own an audio interface and aren’t ready to buy one.
3. Rode PodMic USB – Best Hybrid USB/XLR
RØDE PodMic USB Versatile Dynamic Broadcast…

Type: Dynamic Hybrid
Connectivity: USB-C and XLR
Pattern: Supercardioid
Features: Internal pop filter, headphone output
The Rode PodMic USB solves the biggest dilemma creators face: choosing between USB convenience and XLR quality. This hybrid microphone offers both connections in one package, making it arguably the most future-proof investment for growing YouTube channels.
What sets this microphone apart is the dynamic capsule. Unlike condenser microphones that pick up every sound in your room, the dynamic supercardioid pattern focuses tightly on what’s directly in front of it. I tested this in my untreated home office and was amazed at how much background noise disappeared from recordings.
The built-in pop filter isn’t marketing hype. It genuinely reduces plosive sounds without needing an external filter cluttering your setup. During my testing, I recorded directly into the microphone at close distances without the harsh “P” and “B” sounds that plague lesser microphones.
Connectivity options make this microphone incredibly flexible. Start with USB for simplicity, then switch to XLR when you’re ready to add an audio interface to your setup. You don’t have to replace your microphone as your studio grows. This versatility alone justifies the investment for serious creators planning long-term.
The Revolution software that Rode includes adds serious value. I was able to fine-tune my sound with the high-pass filter, noise gate, and compressor directly in software. For creators who don’t want to learn complex audio processing, these presets make professional results accessible.
Build quality is exceptional. The all-metal body and integrated swing mount feel professional. This microphone looks great on camera and communicates to your audience that you take your content seriously. First impressions matter, and professional gear helps establish credibility.
Who Should Buy?
Perfect for growing channels that want to upgrade gradually, podcasters who need flexibility, and creators who record in less-than-ideal acoustic environments.
Who Should Avoid?
Skip if you need an ultra-budget option, or if you’re certain you’ll never use XLR connectivity.
4. Shure SM7B – Professional Broadcast Standard
Shure SM7B Vocal Dynamic Microphone – XLR…

Type: XLR Dynamic
Pattern: Cardioid
Frequency Response: Flat 50Hz-20kHz
Requires: High-gain preamp
The Shure SM7B is the microphone you hear on your favorite podcasts and YouTube channels. This is the broadcast industry standard used by radio stations, podcast networks, and top-tier creators. When I see this microphone on someone’s desk, I know they’re serious about audio quality.
What makes the SM7B special is its sound signature. The flat frequency response captures your voice exactly as it sounds, with natural warmth and presence that makes listeners feel like you’re in the room with them. After spending weeks recording with this microphone, I noticed viewers commenting specifically on how professional my audio sounded.
The dynamic capsule provides incredible rejection of background noise. I tested this by recording next to a window with construction happening outside. The playback shocked me. My voice came through clear and present while the outdoor noise was barely audible. For creators without professional studio treatment, this microphone is a revelation.
Built-in audio features include both a bass roll-off and presence boost switch. I found the presence boost particularly useful for YouTube content, as it adds clarity and articulation that helps speech cut through without sounding harsh or sibilant.
The build quality is legendary. This microphone is built like a tank and will likely outlast your YouTube career. The internal shock mount suspension isolates the capsule from vibrations, and the integrated pop filter effectively manages plosives without needing external accessories.
Important caveat: this microphone demands proper supporting equipment. You’ll need a high-gain audio interface or a Cloudlifter preamp to drive it properly. Using budget interface preamps will leave you with disappointing results. Budget for at least $200-300 in additional equipment if you choose this path.
Who Should Buy?
Serious creators with budget for complete setups, channels treating YouTube as a business, and anyone wanting the exact gear used by broadcasting professionals.
Who Should Avoid?
Not for beginners on tight budgets, or creators unwilling to invest in proper preamps and supporting equipment.
Understanding Audio Quality for YouTube
Audio quality matters more than most new creators realize. Research shows viewers will abandon videos with poor audio within seconds, even if the visuals are stunning. Your microphone choice directly impacts viewer retention and perceived production value.
The YouTube algorithm also favors videos with higher audience retention and engagement. Poor audio causes viewers to click away early, which signals to YouTube that your content isn’t worth promoting. Investing in quality microphone equipment directly affects your channel’s growth potential.
Professional audio isn’t just about expensive equipment. Proper microphone technique, recording environment, and basic processing often matter more than the microphone itself. I’ve heard $100 microphones outperform $500 models simply because of better technique and smarter room choices.
Consider your content type when choosing audio equipment. Gaming streams, voiceover tutorials, vlogs, and music videos each have different microphone requirements. A dynamic microphone that excels for loud gaming commentary might lack the detail needed for soft-spoken ASMR content.
Buying Guide: How to Choose the Best YouTube Microphone
USB vs XLR: Which Connection Type Do You Need?
The USB versus XLR debate confuses beginners, but the choice comes down to simplicity versus flexibility. USB microphones connect directly to your computer without additional equipment. XLR microphones require an audio interface but offer better audio quality and upgrade potential.
Choose USB if you want plug-and-play simplicity, are working with a tight budget, or don’t plan to expand your setup beyond a single microphone. USB microphones handle all the analog-to-digital conversion internally, making them foolproof for beginners.
Choose XLR if you want the best possible audio quality, plan to expand your studio with multiple microphones, or need professional features like ultra-low noise preamps. XLR systems cost more upfront but offer upgrade paths that USB systems can’t match.
Hybrid microphones like the Rode PodMic USB offer both connections, giving you flexibility to start simple and upgrade later. This versatility makes them excellent long-term investments for growing channels.
Pro Tip: If you choose XLR, budget for an audio interface. The Focusrite Scarlett Solo and SSL 2 are excellent entry-level interfaces that pair well with most XLR microphones.
Dynamic vs Condenser: Matching Mic Type to Your Environment
Dynamic microphones are rugged and directional, making them ideal for untreated rooms and loud environments. They reject background noise and focus on what’s directly in front of them. The Shure SM7B and Rode PodMic USB are dynamic microphones.
Condenser microphones are sensitive and detailed, capturing more nuance but also more room noise. They excel in treated spaces and for capturing vocals with clarity. The Blue Yeti and 512 Audio Skylight are condenser microphones.
If you record in a bedroom or office without acoustic treatment, start with a dynamic microphone. You’ll get cleaner recordings with less background noise. If you have a treated space or want maximum detail, condenser microphones offer superior clarity.
Consider your content type too. Dynamic microphones handle loud sounds like gaming commentary without distortion. Condenser microphones capture the subtle details needed for ASMR, singing, and acoustic instruments.
Understanding Polar Patterns
Polar patterns describe where a microphone picks up sound. Cardioid pattern picks up from the front while rejecting sound from the sides and rear. This is the most common pattern for solo YouTube content.
Omnidirectional pattern picks up sound equally from all directions. Use this for capturing room ambience, recording multiple sound sources, or field recording where capturing the environment matters.
Figure-8 or bidirectional pattern picks up from front and back while rejecting the sides. This is useful for interview situations where two people face each other across a single microphone.
Stereo pattern uses two capsules to create a stereo image. This works well for music recording, nature sounds, or any content where spatial positioning matters.
For most YouTube creators, cardioid is all you need. It provides the best rejection of unwanted sounds while focusing clearly on your voice. Multiple pattern options like those on the Blue Yeti offer flexibility but aren’t necessary if you only record solo content.
Budget Breakdown: How Much Should You Spend?
Under $75 is the budget tier. Microphones in this range include the Mackie EM-91CU and Fifine AM8. These provide decent audio quality and significant upgrades over built-in microphones, but may lack features or build quality. Perfect for testing whether YouTube is right for you before major investments.
The $100-200 mid-range tier offers the best value for most creators. This is where you find the Blue Yeti, 512 Audio Skylight, and many quality USB options. These microphones provide professional sound quality without requiring additional equipment. Most successful YouTubers operate in this price range.
Premium microphones above $200 include the Shure SM7B, Rode PodMic USB, and high-end USB models like the Shure MV7+. These deliver broadcast quality and durability that lasts for years. Choose this tier if YouTube is your career or you demand the absolute best audio quality.
Remember to budget for accessories. Boom arms, pop filters, cables, and audio interfaces add $50-300 to your total investment. Factor these costs when deciding your microphone budget.
| Microphone Type | Best For | Price Range | Additional Equipment Needed |
|---|---|---|---|
| USB Condenser | Beginners, treated rooms | $50-150 | None (stand optional) |
| USB Dynamic | Untreated rooms, gaming | $100-250 | None (stand optional) |
| XLR Condenser | Studio recording, vocals | $100-500 | Audio interface, XLR cable, stand |
| XLR Dynamic | Broadcast, podcasting | $200-500 | Interface or preamp, XLR cable, stand |
| Hybrid | Growing setups | $150-250 | Stand (interface optional) |
YouTube Microphone Setup Guide
Microphone Placement for Best Sound
Distance matters more than most creators realize. Position your microphone 6-12 inches from your mouth for most USB microphones. XLR dynamic microphones like the SM7B work best 2-4 inches away for intimate broadcast sound.
Angle the microphone slightly off-axis rather than singing directly into the center. This reduces plosive sounds and sibilance while maintaining clarity. A 15-30 degree angle works well for most cardioid microphones.
Keep the microphone below your mouth line and angled upward. This prevents breathing sounds from hitting the capsule directly while catching your voice clearly. This is why boom arms are so useful for positioning.
Essential Accessories Worth Buying
A boom arm is the first accessory I recommend. Desk vibrations transmit directly through microphone stands into your recordings. A quality boom arm isolates the microphone and gives you precise positioning control.
Pop filters reduce harsh plosive sounds from P and B consonants. While some microphones include built-in pop filtering like the Rode PodMic USB, an external pop filter provides additional protection and better positioning flexibility.
Acoustic treatment makes a bigger difference than microphone upgrades for most creators. Even simple foam panels or thick curtains significantly reduce room echo. I’ve heard $100 microphones in treated rooms outperform $500 microphones in echoey spaces.
Software Settings for YouTube Audio
Set your recording level to peak around -12dB to -6dB. This gives you headroom for loud moments without distortion. Digital clipping sounds terrible and is impossible to fix in post-production.
Most recording software includes basic processing. A high-pass filter around 80Hz removes low-frequency rumble without affecting your voice. Light compression (2:1 ratio, 3-6dB gain reduction) evens out your levels and makes your voice sound more consistent.
Export your final audio at 44.1kHz or 48kHz and 16-bit or 24-bit for YouTube. Higher sample rates are unnecessary for voice content and increase file sizes without audible benefit.
Time Saver: Save your microphone settings as presets in your recording software. This ensures consistent audio across all your videos without adjusting settings every recording session.
Frequently Asked Questions
What microphone do most YouTubers use?
Most YouTubers use USB microphones like the Blue Yeti for beginners, while professional creators often upgrade to XLR options like the Shure SM7B. Popular choices among established creators include the Rode PodMic USB for its hybrid connectivity and the HyperX QuadCast for gaming-focused channels.
What is the best microphone for recording YouTube videos?
The Blue Yeti is the best overall microphone for most YouTube creators due to its versatility and ease of use. Budget-conscious creators should consider the 512 Audio Skylight, while professionals should invest in the Shure SM7B. Your choice depends on budget, recording environment, and content type.
Do you need a special microphone for YouTube?
You don’t need a YouTube-specific microphone, but microphones designed for content creation offer features that help. USB microphones with plug-and-play simplicity work well for beginners. Any quality microphone with a cardioid pattern can produce excellent YouTube audio with proper technique.
How much should I spend on a YouTube microphone?
Plan to spend $50-150 for your first microphone as a beginner. This range includes quality options like the Blue Yeti and 512 Audio Skylight. Mid-range creators typically invest $100-250, while professionals spend $300-500 plus $100-200 for supporting equipment like audio interfaces and boom arms.
Is a USB or XLR microphone better for YouTube?
USB microphones are better for beginners due to plug-and-play simplicity and lower cost. XLR microphones offer superior audio quality and upgrade paths for growing channels. Hybrid microphones like the Rode PodMic USB provide both connections, letting you start with USB and switch to XLR as your needs evolve.
What microphone should I buy for YouTube gaming?
Dynamic microphones work best for gaming because they reject keyboard sounds and background noise. The HyperX QuadCast 2 and Elgato Wave 3 are popular gaming choices. USB options with directional patterns and mute buttons are ideal for streamers who need to quickly cut audio during intense moments.
Do I need an audio interface for YouTube?
You only need an audio interface if using an XLR microphone. USB microphones connect directly to your computer without additional equipment. XLR systems require an interface to convert analog signals to digital, but offer better audio quality and flexibility for expanding your setup.
How do I get good sound on YouTube?
Good YouTube audio requires three elements: a quality microphone positioned 6-12 inches from your mouth, recording in a quiet room with minimal echo, and proper gain settings. Adding basic acoustic treatment and using a pop filter further improves quality. Consistent microphone technique matters more than expensive equipment.
Final Recommendations
After testing these microphones across different scenarios and recording environments, here are my final recommendations based on creator type and budget.
For complete beginners, start with the Blue Yeti. Its plug-and-play nature, versatile pickup patterns, and proven track record make it the safest investment for new channels. You won’t outgrow it quickly, and it holds resale value if you decide to upgrade later.
Budget-conscious creators ready for XLR should choose the 512 Audio Skylight. This microphone delivers professional sound at an unbeatable price point. Pair it with a basic audio interface, and you have a recording chain that rivals setups costing three times as much.
Growing channels wanting future-proof flexibility should invest in the Rode PodMic USB. The hybrid connectivity lets you start with USB simplicity today and switch to XLR quality tomorrow without replacing your microphone. It’s the smartest long-term investment.
Serious creators treating YouTube as a business should go straight to the Shure SM7B. This is the microphone your favorite creators use, and there’s a reason for that. Professional broadcast quality, incredible noise rejection, and legendary build quality make it worth every penny.
For complete content creation workstations, check out our guide to the best monitors for your content creation setup or explore tablets and keyboards for mobile YouTube creation.
Remember: the best microphone is the one you’ll actually use. All the microphones reviewed here produce excellent audio when used properly. Focus on proper technique, good positioning, and consistent recording habits. These factors matter more than the specific microphone you choose.